
The 1969 GTX Build (Part One): Preparing the 505ci Mopar Short Block
Duda Owner IONOS • September 18, 2020
Editor’s Note: Since 1988 Rick Sylstra has been building engines and specializes in street performance, racing engines, and vehicle restoration. For this Mopar build Rick has enlisted master engine builder Jerry Bermudez. Jerry’s shop, Jerry’s Performance Engines, specializes in street performance, racing engines and vintage vehicle repair.
Our goal for “The 1969 GTX Build” has always been to find improvements that allow it to go faster, handle better, and give the modern muscle cars and Imports a run for their money. In no way are we trying to build a full blown race engine, just a 600+ horsepower street engine that runs on pump gas. This 1969 GTX had a stock 440 cubic inch HO engine that produces 375 horsepower with a 727 transmission, producing 292 horsepower on the dyno.
The Engine Block
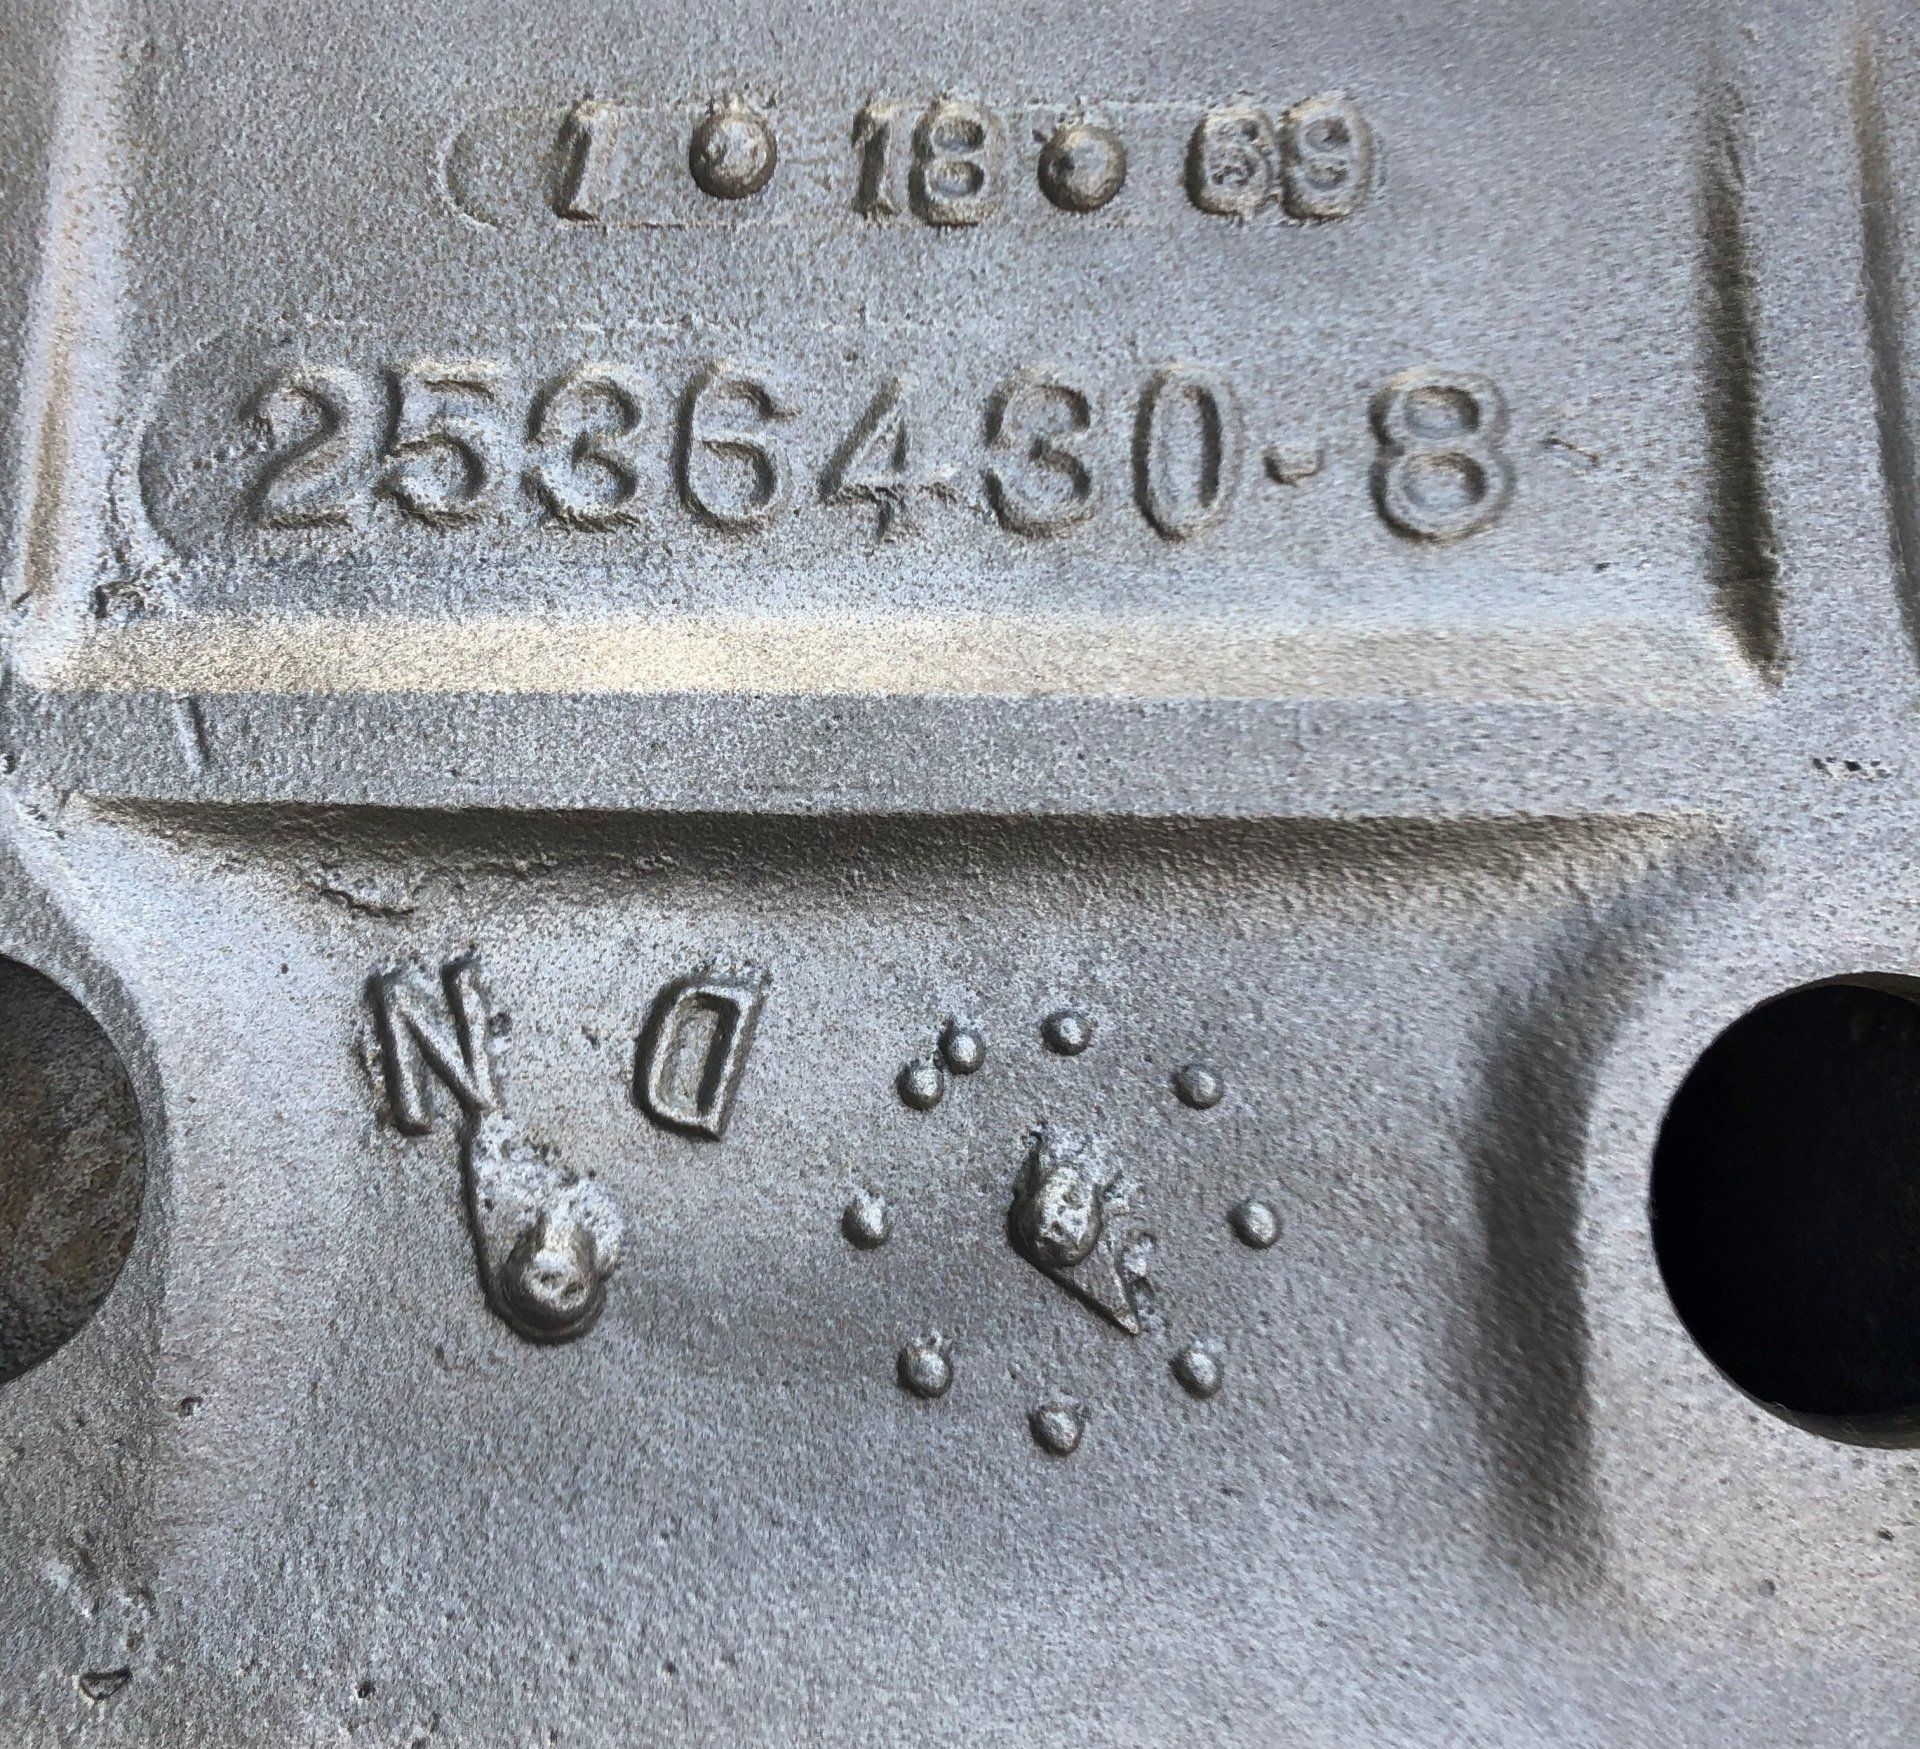
Knowing the superstition that surrounds the 440 Mopar blocks we decided to use 1969 block as this was the first year the 440 was given a strengthening rib and this block would fit the car keeping both original engine size and build date in mind.
The search for a 1969 E code 440 block was on and after a several days the engine block was finally located in Dana Point, CA. Our plan was to take the stock 440 with a 4.320-inch bore diameter and bore it 0.030 inches over for a final bore diameter of 4.350 inches.
The Rotating Assembly
The final decision on the rotating assembly was a complete kit from the 440 Source part # 440.512.5060. This kit would take our stroker engine to 505ci using a Chevy sized rod journal. We also sprung for the light weight crank and the ARP2000 rod bolts. The kit includes Clevite “H” series bearings and total seal rings. Using this kit with a 78cc head on a zero-deck block with a 4.380” head gasket gives us a 10.63:1 compression ratio.
Here are the specs for the short block:
Zero deck height
Cylinder bore: 4.350 inches
Stroke: 4.250 inches
Connecting rod length: 7.100 inches
Main journal diameter: 2.750 inches
Rod journal diameter: 2.200 inches
Pistons -17 dish
The block was sent to Jerry’s Performance Engines for initial prep such as pulling freeze plugs and anything else that needed to be removed. After Jerry’s initial inspection of the block and rotating assembly the parts were delivered for machining.
Block Machining
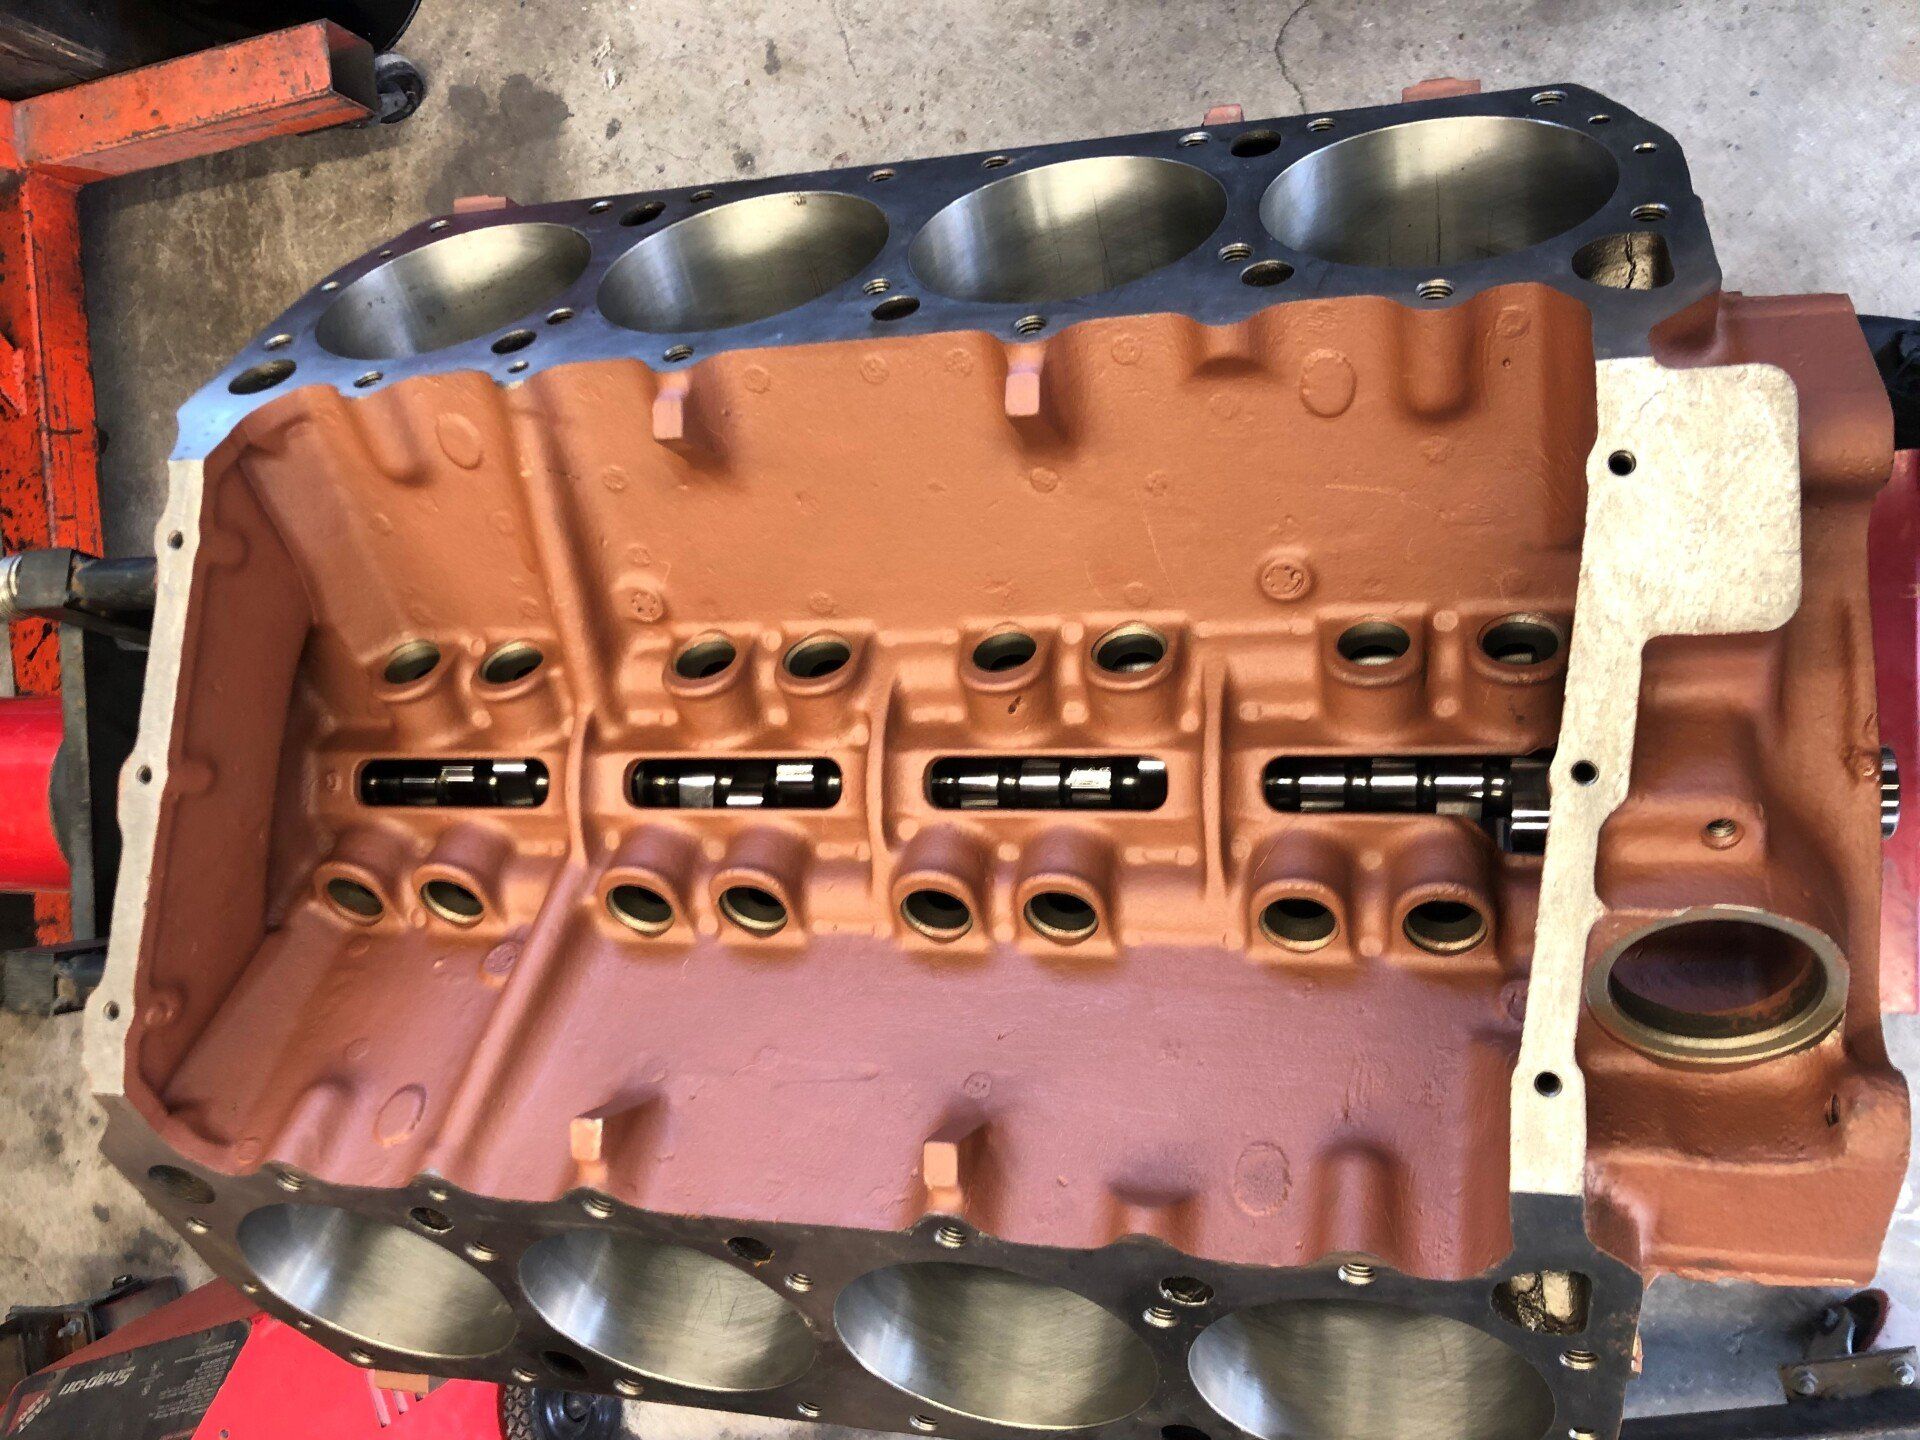
The cylinder bores were machined to a finished diameter of 4.350 inches and the block was decked at a height of zero. The main caps were replaced with billet steel main caps to add strength to the block, the caps were fitted to the block's registers, along with line boring, and honing the main caps as required. To strengthen the bottom end of this high horsepower big block Mopar a ¼” Main Girdle was added. Inserts were added to ensure the engine’s primary oil gallery is supplied first to the main bearings and then to the cam, lifters, and top end. The “H Beam” rods were machined for both journal and wrist pin clearance and the entire assembly was rebalanced. Choosing the 440 Source stroker kit was a no brainer as the connecting rod big end-to-block clearance and crank counterweight-to-block clearance were spot on. No notching was needed to prevent the rods or edges of the crank counterweights from hitting the block. The block and rotating assembly were sent back to Jerry’s Performance Engines for final block prep.
Final Block Prep
Jerry spent several days eliminating the casting seam, edge flashings, drain back opening edges, and smoothed the valley surfaces to promote better oil drain back. A coat of primer was brushed on the lifter valley and inside the crankcase walls, to improve oil drain back and prevent iron particles migrating into the engine oil. All main cap and head bolt holes were cleaned and checked with a chasing tap. The oil passages were cleaned with bottle brushes and the block was washed with hot water and dishwashing soap. The block exterior was cleaned and masked for paint. Three coats of paint (VHT Hemi Orange) were applied and the block was given a final wash.
Jerry starts the blueprinting process with measuring the block tolerances, crank shaft tolerances, rod tolerances, and bearing tolerances. These tolerances are written down and parts are matched to fit within the specified measurement. When finished these parts are as dead on as possible. The piston and rods are reweighted to insure they are all the same weight or balanced. The rings are hand filed and the pistons are assembled. The block is checked at Top Dead Center to see if the piston is 0.000 inches in the hole at TDC.
In Part Two, we’ll cover bottom end assembly, camshaft selection, and more.


There are so many good reasons to communicate with site visitors. Tell them about sales and new products or update them with tips and information.

Write about something you know. If you don’t know much about a specific topic that will interest your readers, invite an expert to write about it.